|
Focus stacking, a technique in photography, offers a solution to the challenge of achieving sharpness and extended depth of field. By combining multiple images with different focal points, this method enhances image clarity. In this blog post, we'll explore the advantages of focus stacking and its potential to elevate your photography.
Advantages of Focus Stacking:
0 Comments
 When I first started taking digital images, I was not a fan. My images were just not as good to me as my film. I just didn't understand.. After all, I could now take as many digital photos as I want right! And I was shooting alot of images. After having this conversation with a colleague he enlightened me! He told me to treat it like film! Film was precious. Only 24 pictures, no second chances.. You had to get it right! I'm not saying we need to go back to film. What I am saying is when taking a photo with your digital whatever.. Take the time to create something special!
The time required to take a good photo can vary greatly depending on the subject, environment, equipment, and desired outcome. In some cases, a good photo can be captured in a split second, while in other cases, it may take hours or even days to get the perfect shot. Factors that can affect the time required to take a good photo include:
Oh, and happy PI day! 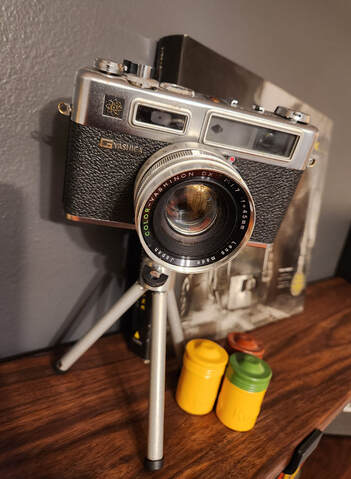 Yashica Electro-35 Yashica Electro-35 NEW Mirrorless camera technology!
This post is quite sad for me.. I've shot with SLR/DSLR cameras since I started taking photographs. OK, I had a rangefinder en.wikipedia.org/wiki/Yashica_Electro_35Yashica Electro-35 before my first SLR. SLR/DSLR cameras were THE camera for most professionals! They were the standard in film, and then stayed the camera of choice through the change to digital imaging. To see them go is just another milestone in camera advancement. But, it hurts to let go of something you have used most of your life. That being said, I'm sure my next camera will be mirrorless! Let find out why. Mirrorless cameras have taken the photography world by storm in recent years, offering a compact and lightweight alternative to traditional DSLR cameras. So, what exactly is a mirrorless camera? Simply put, a mirrorless camera is a digital camera that does not have a mirror or optical viewfinder. Instead, these cameras rely on an electronic viewfinder or rear LCD screen to preview the image. One of the biggest advantages of mirrorless cameras is their size and weight. Because they don't have a bulky mirror system, mirrorless cameras are typically smaller and lighter than DSLRs, making them more portable and easier to carry around. Another key advantage of mirrorless cameras is their fast and accurate autofocus system. Thanks to their advanced sensor technology, mirrorless cameras can quickly and accurately focus on your subject, even in low-light conditions. In addition, mirrorless cameras are often more customizable than DSLRs, allowing you to quickly adjust settings such as exposure, ISO, and white balance. Some even allow you to control the camera using a smartphone app, giving you even more flexibility and control. When it comes to image quality, mirrorless cameras are on par with DSLRs. They offer high resolution sensors, fast image processing, and excellent image quality, even in low light conditions. So, if you're in the market for a new camera, consider a mirrorless camera. With their compact size, fast autofocus, and excellent image quality, they're a great choice for photographers of all levels. I don't need to look in the mirror any more. I'm going mirrorless for my next camera! Tips for better photos with your iPhone
This year it is estimated that over 1.3 trillion digital photos will be taken. In contrast, back in the glory days of film (the year 2000) only 80 billion photos were taken. This is huge increase in images taken. All due to the advancements in digital technology and your phone! It is often said that the best camera is the one that’s with you. Your iPhone is always with you, right? 79% percent of all photos today are taken by phones 13% are still taken by camera 8% percent on tablets Here are some tips on taking better photos with your iPhone. And yes, I know there are other phones that also happen to take pictures. And I would encourage you to look up how to take better photos with your android device also. Tip #1 - Focus Tap on your screen in picture mode to focus on the area, you want in focus. Which brings us to tip #2. Tip #2 - Exposure While you are tapping the screen for focus, you will get a little box on your screen. On the right of that box slide your finger up and down on the screen to adjust exposure. Tip #3 – Rule of thirds Turn on the grid for better compositions. If, you need to know what rule of thirds is go here. Tip #4 – Clean your lens I know, this is kind of a given.. Wipe that sucker off once and a while! Tip #5 – Force your flash to fire Anytime there are shadows on faces in your photos. Turn your flash to ON. This will make your flash fire and light up the faces. Flash is not just for nighttime! Tip #6 – Rear Facing Camera The camera on the back of your iPhone is a higher resolution camera than the one on the screen side. Always use the rear facing camera when possible! Tip #7 – Rapid Fire Hold down your shutter button for rapid sequence photos. Tip #8 – Low Light Try shooting black and white in low light for dramatic effect. Tip #9 – Headphones Put your phone in camera mode. You use your apple headphones with the volume controls to trigger your shutter on your iPhone. The up volume. Tip #10 – Props You all know I’m a fan of propping up on anything and everything. Steady your camera in low light, by holding it against a post, wall, table, fence, whatever… I hope you will find these tips useful in your photos. Also remember to take lots of pics! You can always delete the extras later. You might not get another chance for that photo.. Joe When we were in school we all hated assignments. Whether they be in class or homework, an assignment was never good. But, we needed them! I know I did. It got us focused on what we were studying and kept us there till get learned it. I've grown older and wiser I hope. I now understand that as part of the learning process, we can use assignments to continue our lifelong learning. Sometimes when I go out to shoot, I know what the subject I'm going to shoot. Then other times I just go out to see what I can find to shoot. I enjoy both of these strategies. But, in my photography I get stagnant in my creative process sometimes. I often use assignments to engage my creative side. Assignment can be as simple or complex as you want to make them. The idea of assignments are to get you out of your box, and shoot something you would not normally shoot. When I would go out in the French Quarter shooting I had several assignments I liked to do. These are a few of my assignments:
I find it very interesting that you can give many people the same assignment, and yet all of there photos will look wildly different. That being said your assignments might be wildly different from my suggestions. Please give yourself assignments that passionate to you! This is what makes us better and unique photographers. If you go out and try to take the same image as someone else you are not fostering your creativity, just mimicking others. it is OK to look to others for inspiration, but put your spin on it and make it your own! Try using assignments in your photography and let me know how it goes... I would love to hear about it!
Something that I do (this comes from my old film days) sometimes is I limit the shots I take to 24 or 36 images. Back in the day, when we shot film it was precious! You only had 24 or 36 images to capture. You had to make then count! You did not want to waste any of them. When I first converted to digital, I commented to another profession photographer friend of mine that my digital images were not as good as my film counterparts. He ask if I was shooting a lot of images, and I said yes. He said don't shoot so many images, treat it like film. Take the time to capture great images! It's all to easy in this digital age where we can capture all the images we want, to get caught up into not taking the time for a great image... So there, another assignment Go shoot just 24 stunning images, that are just green, and of just square things, and have reflections in them. GO! 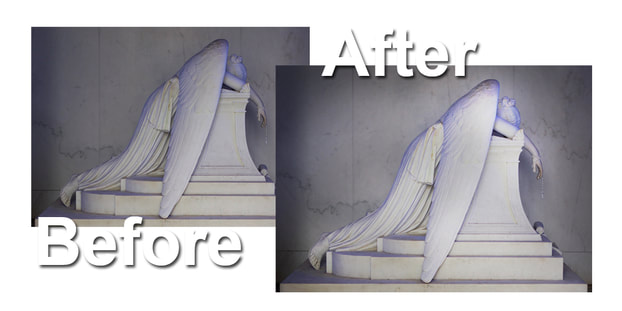 Burning and Dodging has been a part of photography since the beginning. The Dodge tool and the Burn tool lighten or darken areas of the image. These tools are based on a traditional darkroom technique for regulating exposure on specific areas of a print. Photographers hold back light to lighten an area on the print (dodging) or increase the exposure to darken areas on a print (burning). In the early years of photography you would use a disk on the end of a stick, wave it in between the enlarger and your paper and block the exposure to the paper. This was dodging. The opposite of dodging was burning where you could over-expose an area.
In the digital era, we no longer do this in the darkroom. Although I'm old enough, and have done it the old fashioned way... Today it's much more precise and not near as messy! First let me say, I'm a big fan of non-destructive editing! If you don't know what that means I'll tell you. Quite simply it means not to damage or change your base image. You can always get back to any step in your editing process. This post is about non-destructive burning and dodging in the digital age. I'm going to assume you have a basic knowledge of Photoshop for this tutorial. First create a new layer call it "burn and dodge" above your base image layer. Fill this layer with neutral grey (R127,G127,B127). Set that layer to OVERLAY. When you do this your base layer will look the same as it was originally, but when you paint on the "burn and dodge" layer with black it burns and paint with white it dodges. If you want to go back to neutral paint with (R127,G127,B127). I usually cut the opacity down on my paint brush to about 6-9% when I burn and dodge. You can do all the burning and dodging you want and not do any damage to the original image on the layer below! I also automated this process by creating an action in Photoshop that creates a new layer, fills it with (R127,G127,B127), then changes it to OVERLAY. One click and I get to "Feel the Burn"! A few years ago, Pam and I were heading to Lafitte's Blacksmith Shop for a cocktail when I noticed the Clover Grill was being used for the filming of the movie Benjamin Buttons. I immediately ran back to the house to get my camera because the Clover was dressed up for photography! I got some really great shots that I could never get again! They had replaced the sign lights with lower wattage, the interior was staged to a forties diner, and cleaned up outside (newspaper racks, trashcans gone, etc.). It was perfect! Now, to the point of this blog post. While I was out taking pictures of the Clover Grill my friend Michael Ra happened to be passing by and I captured an image of him walking in front of Clover. A little back story here.. Michael claimed to be Egyptian, a psychic reader, medium, and to have died like eight times! Now, I have been taking photographs for a LONG time and never had my camera do anything like what happened this evening. Below is the three picture (tryptich) of images straight out of my camera. They are in sequence. 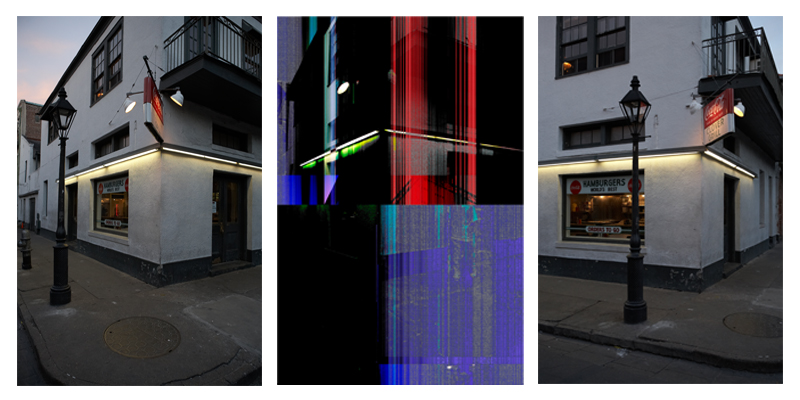 Michael Ra can be seen in the middle image (upper part of the blue area). I spoke to Michael about this phenomena after it occurred. He commented "you didn't ask me if you could take my picture, that's what happens". What? Like I said earlier I have been taking pictures a long time. I've shot over 20,000 photographs on this camera. Never had an image look weird.... WTH! New Orleans is a unique place with many unique people. Michael Ra is one of those people. Pam and I are glad to call him a friend. Michael also made soaps and oils with the original Egyptian recipes which he sold in the French Quarter! 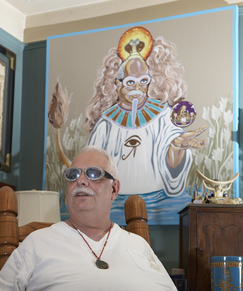 Michael Ra photo by Joe Dunn If you are in NOLA, stop by the Clover Grill and get one of the best cheeseburgers you will ever have! They cook them under a hubcap. The staff has serious attitude also, if they tell you to sit down, shut up and they will take your order soon don't take it personally!
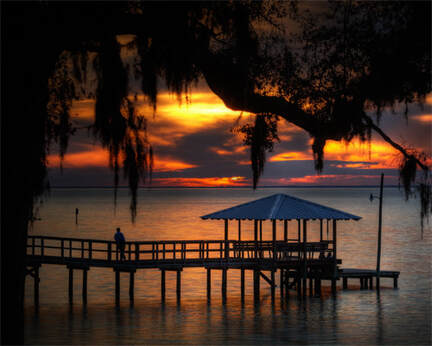
I have always been taken with low light, night time photography. If you have seen my photographs you know this already. It fascinated me the way headlights and taillights on cars taken with a long exposure would leave long trails of light in my images. I love to shoot fireworks too, for the same reason! To do long exposure, low light photography properly all you need is a tripod and a cable release the shutter without moving the camera. This brings me to the subject of this blog post. All you need is something to "prop up" your camera to steady it to take nighttime photos! While I carry around a tripod and cable release you don't have too! I often would see people in New Orleans at night trying to hold their cameras as steady as they can to take a picture in low light. Still a tough proposition... Try this instead. Next time you find yourself wanting a low light picture just hold your camera tight up against something solid. You can use a post as seen in the image below. I have used this technique on many occasions when I did not have a tripod with me. I've used walls, fences, lampposts, roof of the car, trashcans, etc.... Its always better than trying to hand hold a long exposure. Be sure and turn off your flash when shooting nighttime shots. If your camera has a ISO adjustment (sensor sensitivity) turn it to a higher number and it will shorten your exposure time. Also, open up the lens to the lower f-stops to let in more light. That in it self will increase your chances of capturing a better image. However, increasing the ISO will increase noise, so only use the highest number you need. I hope this proves to be helpful in your photography. If you have any questions on any of my blog posts, please comment on this page and I will reply! 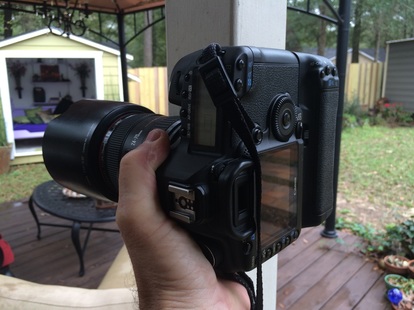 Photo by Joe Dunn One last tip! You can use your self timer on your camera to release the shutter without touching the camera. Just sit your camera on a stable surface and trip the self timer and voila!
I wrote a blog post on this about 3 months ago and it went missing from my website? So, here we go again! Café Du Monde is one of those must do while in New Orleans. Here are a few tips to help you navigate the traffic into the café. After living in New Orleans for many years we noticed that people would queue up, down the sidewalk in front of Jackson Square to get into Café Du Monde. Café Du Monde is a first come, first serve café. With THREE entrances to the café you should never wait in the single line that forms on Decatur St. There is one entrance nearest Jackson Square where everyone queues up, there's one a little farther down towards the French Market, and one in the rear of the café on the back alley. The one closest to the French Market, and the "back door" are usually not busy. There is however a takeout window by the back door that usually has a line for to go orders. You can just cross that line and go find you a seat! When finding a table at Café Du Monde look for someone getting up, and go sit at their table! The waiters will come and bus your table and take your order.  Beignets by Joe Dunn Have a couple of Beignets for me!
Lafitte's Blacksmith Shop Bar - 941 Bourbon St. It's reputed to be the oldest continually operating bar in the US. This is quite a claim. And, really hard to prove considering it was owned by a pirate, sorry privateer. People of this profession were not much into keeping records as their dealing were mostly illegal. The records do show that Jean Lafitte owned blacksmith shop at the corner of Bourbon and St. Philip.... On which corner it does not say. I'm posting the history from the Lafitte's Blacksmith Shop's webpage for your to look over below. You can come to your own conclusions! From the Lafitte's webpage: Lafitte's Blacksmith Shop -- built between 1722 and 1732 by Nicolas Touze, is reputed to be the oldest structure used as a bar in the United States. In 1722, further building is recorded by a realty transfer set down by one Don Andres Almonester. The structure and fence are in the old French Provincial Louis XV or Briquette-Entre-Poteauxe style used in French Louisiana. The building escaped two great fires at the turn of the 19th Century, due to slate roofing. Such slates are presently used by artists as canvases. Between 1772 and 1791, the property is believed to have been used by the Lafitte Brothers, Jean and Pierre as a New Orleans base for their Barataria smuggling operation. The legend is based on the fact that the property was owned by the family of Simon Duroche a.k.a. Castillon and the wily privateer Captain Rene Beluche. Castillon was a rather record-shy adventurer and entrepreneur. Captain Beluche commanded his ship "Spy" in Lafitte's Baratarian fleet. Although the owners of the property, Jean Baptiste Dominica Joly LaPorte probably lived on the premises, it is within reason that the Lafittes could have used the place as city base for negotiations with potential buyers of their goods. It is unlikely that a wealthy Creole would agree to meet at home on Royal Street. Bourbon and St. Phillip was probably regarded as a safe and convenient neutral ground. Like most New Orleans legends, Lafitte's Blacksmith Shop is a gumbo of truth and French, Spanish, African, Cajun and American embellishments. 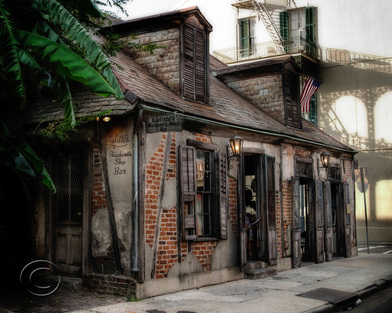 "The Shop" photograph by Joe Dunn I do know that they make the BEST hurricanes in the city (my opinion)! It is a great place to hang out and take in the local culture. I do have some recommendations while you're there. Many of the walking tours in the city stop by "The Shop" as some of our group call it, If they do go immediately to the bar or the bathroom whichever you need. Because all of those on the tour will want a drink and to go to the bathroom! Also, while you're there keep your eyes open for celebrities! It's a known hang out because it's off the radar of most the tourist bars. While in the bar, check out the photographs of the bar on their walls. They are all my work.
Here is a list of the pieces on the walls: Lafitte's Secret- Over the fireplace Curb Service - on the side entrance wall Lafitte's Night - by the bar (this one is sold out, sorry) Lafitte's - over the juke box (this one is sold out, sorry) If you get there send me a picture! Oh, and have a Hurricane for me! |
Joe Dunn
Artist / photographer Archives
July 2023
Categories |
 RSS Feed