|
When we were in school we all hated assignments. Whether they be in class or homework, an assignment was never good. But, we needed them! I know I did. It got us focused on what we were studying and kept us there till get learned it. I've grown older and wiser I hope. I now understand that as part of the learning process, we can use assignments to continue our lifelong learning. Sometimes when I go out to shoot, I know what the subject I'm going to shoot. Then other times I just go out to see what I can find to shoot. I enjoy both of these strategies. But, in my photography I get stagnant in my creative process sometimes. I often use assignments to engage my creative side. Assignment can be as simple or complex as you want to make them. The idea of assignments are to get you out of your box, and shoot something you would not normally shoot. When I would go out in the French Quarter shooting I had several assignments I liked to do. These are a few of my assignments:
I find it very interesting that you can give many people the same assignment, and yet all of there photos will look wildly different. That being said your assignments might be wildly different from my suggestions. Please give yourself assignments that passionate to you! This is what makes us better and unique photographers. If you go out and try to take the same image as someone else you are not fostering your creativity, just mimicking others. it is OK to look to others for inspiration, but put your spin on it and make it your own! Try using assignments in your photography and let me know how it goes... I would love to hear about it!
Something that I do (this comes from my old film days) sometimes is I limit the shots I take to 24 or 36 images. Back in the day, when we shot film it was precious! You only had 24 or 36 images to capture. You had to make then count! You did not want to waste any of them. When I first converted to digital, I commented to another profession photographer friend of mine that my digital images were not as good as my film counterparts. He ask if I was shooting a lot of images, and I said yes. He said don't shoot so many images, treat it like film. Take the time to capture great images! It's all to easy in this digital age where we can capture all the images we want, to get caught up into not taking the time for a great image... So there, another assignment Go shoot just 24 stunning images, that are just green, and of just square things, and have reflections in them. GO!
0 Comments
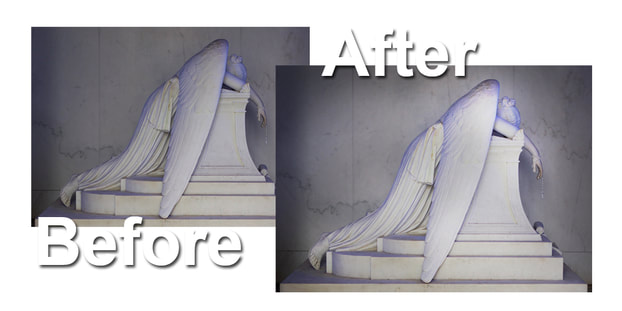 Burning and Dodging has been a part of photography since the beginning. The Dodge tool and the Burn tool lighten or darken areas of the image. These tools are based on a traditional darkroom technique for regulating exposure on specific areas of a print. Photographers hold back light to lighten an area on the print (dodging) or increase the exposure to darken areas on a print (burning). In the early years of photography you would use a disk on the end of a stick, wave it in between the enlarger and your paper and block the exposure to the paper. This was dodging. The opposite of dodging was burning where you could over-expose an area.
In the digital era, we no longer do this in the darkroom. Although I'm old enough, and have done it the old fashioned way... Today it's much more precise and not near as messy! First let me say, I'm a big fan of non-destructive editing! If you don't know what that means I'll tell you. Quite simply it means not to damage or change your base image. You can always get back to any step in your editing process. This post is about non-destructive burning and dodging in the digital age. I'm going to assume you have a basic knowledge of Photoshop for this tutorial. First create a new layer call it "burn and dodge" above your base image layer. Fill this layer with neutral grey (R127,G127,B127). Set that layer to OVERLAY. When you do this your base layer will look the same as it was originally, but when you paint on the "burn and dodge" layer with black it burns and paint with white it dodges. If you want to go back to neutral paint with (R127,G127,B127). I usually cut the opacity down on my paint brush to about 6-9% when I burn and dodge. You can do all the burning and dodging you want and not do any damage to the original image on the layer below! I also automated this process by creating an action in Photoshop that creates a new layer, fills it with (R127,G127,B127), then changes it to OVERLAY. One click and I get to "Feel the Burn"! |
Joe Dunn
Artist / photographer Archives
July 2023
Categories |
 RSS Feed